Showing posts with label Improve Vista's performance. Show all posts

Saturday, October 18, 2008

Plug-and-Play Doesn't Work, Pt 1*

Windows 95 introduced a method for automatically detecting and installing (configuring) newly attached devices, which was called "Plug and Play" (PnP). The idea was that you could insert a relatively new super-enhancer, like a graphics card, or sound card, (there was a big deal called "multimedia" happening then, if you recall-- "The new Pentium II, with MMX!") into a slot inside your machine and Windows would automatically make it work.

This worked so well that folks quickly re-dubbed it "Plug and Pray".
(For the sake of fairness, and for those of you with a historical sense, it is my belief that the responsibility for the bad name PnP acquired lies at the feet of the card makers, particularly Creative Labs Sound Blaster cards, as much as it did Microsoft.)

Before Plug and Play came along, adding a new device to your PC was a huge ordeal. There were tiny switches (called "dips") and little wire bridges ("jumpers") and IRQs, and such, that had to be fiddled with in an agonizing series of trial-and-error attempts that would try the patience of the most stalwart soul.

Fortunately for all of us, Windows and device manufacturers have been (for the most part) working hard to make the concept behind PnP a reality. Each successive iteration of Windows has become better and better at easy, automatic, device installation. By the time of Windows XP, it was a rare occasion when Plug and Play required additional efforts on our part before our new scanner/webcam/printer/graphics card/etc. would function as it should.

With Vista we have a whole new set of issues. PnP works almost exactly as it should, effortlessly. As long as we're adding a brand-new, Vista compatible device, all you have to do is plug it in and power it on. The problem we have in Vista is with our old devices -- devices manufactured before Vista was a gleam in Microsoft's eye -- like that old, reliable Deskjet 970Cse.

Tip of the day: Get those recalcitrant devices working, Pt.1.
The first step in installing a new device is to follow the instructions that come with it, and (usually) inserting the Installation CD, and letting Plug and Play 'do its thing'.
Frequently this is all you need to do (although you may be asked to reboot).

The first troubleshooting step, should this fail, or should Vista reject the device, is to go online and visit the device manufacturer's website. There you should look in their "Support" section for "Drivers" and/or "download drivers". Find the most recent release for your version of Windows (Vista users may have to do a Web Search) and take careful note of whether it is the 32-bit, or 64-bit version. Almost all of you out there want the 32-bit version. [If you are unsure whether you have 32 or 64-bit Windows: right-click My Computer and select Properties. The info titled "System" will tell you your version.]

Now click on the download link, and when asked if you want to "run" or "save" this program, click on "Save". You will be (or at least, should be) asked where you want to save the program to, and since it will most likely have a bizarre and forgettable name, save it to your desktop.

Once the download is completed and saved, close your web browser and any other programs you have running -- it shouldn't be necessary to shut down your protection, like antivirus, but be prepared to hit "allow", quickly.
Now double-click the download. Usually, a wizard will open, asking you to hit "Next", "I agree", "Next"...just follow along.

When it's done, odds are good your device will now work as it should, but whether it does or not, the next step is to restart your machine ("reboot"). This process will resolve the majority of, but not all, device related issues. Vista users may run into a situation where the device in question is no longer "supported" by the manufacturer, or simply hasn't gotten around to writing Vista drivers yet. A Search for "Vista drivers for make+model" will likely turn up a solution.

There are further troubleshooting steps you can take if this does not resolve your issue (see links below. Also, there are websites that specialize in nothing but device drivers, and these are often an excellent place to start looking for hard-to-find drivers. I am including one such site below.

http://techpaul.wordpress.com/2007/07/12/adding-hardware-when-pnp-doesnt-work-part-2/

http://techpaul.wordpress.com/2007/07/13/concluding-add-new-hardware-when-pnp-doesnt-work/

Today's free link: DriversPlanet From site: "DriversPlanet.com is the Web's trusted resource for technology enthusiasts, IT consultants and IT professionals searching for any device driver. DriversPlanet.com provides an easy way of finding drivers in one spot enabling you not to get lost in worldwide chaos of drivers."

Copyright 2007-8 © Tech Paul. All rights reserved.jaanix post to jaanix

Friday, October 17, 2008

If It Ain't Broke, Don't Fix It*

There is something wonderful in this simple philosophy. It certainly is an aggravation saver, and I believe it is a good, honest, tip for a happier life. It is applicable in all aspects of our daily lives -- including our tech gadgets.

Some people (me), though, have some malformed gene, or mis-wired section in their brain which renders them constitutionally incapable of keeping their mischievous little fingers off of a perfectly functioning device. These people have a strange compulsion to try to "make it better". They just have to open it up and look at what's inside...
A highly Scientific Study (that I just made up) has proven that a full 9-out-of-10 of these personality-types not only fail to "improve" the device, they fail to get all the piecesTim the Toolman back inside, much less back in their proper places.

The modern name for these people is "tweaker". The most 'famous' tweaker was probably Tim ["the tool man"] Taylor, a character made famous by Tim Allen on Home Improvement. (I loved it when he "improved" the kitchen garbage disposal by powering it with a chainsaw engine.) His motto: More power!

Yes, "if it ain't broke, don't fix it" is a very good Rule. For that 90% of tweakers who only succeed in disassembling the object of their interest, it ought to be a Law. However (you, Dear Reader, were expecting a "however", right?), tweaking can be a good thing. Tweaking sometimes leads to Invention. Successful and repeatable tweaks are called "optimizing". And who can argue against optimizing? Not me. A great deal of Tech--for Everyone is about optimizing your PC.. such as today's tip.

Tip of the day: Optimize your computer with the latest device drivers. Most of my readers should be aware of the existence of the small programs that allow the software on our machines (primarily the OS) to interact with the hardware, which are called "device drivers". If you've ever added a new device, you (typically) had to put in a CD and install the "driver" to get it operational. My readers probably also know that, like other programs, drivers get "updated", and improved, occasionally. Did you also know that by seeking out, and installing the latest drivers, you can have a faster machine? Or, that your device may suddenly have more "features" and capabilities? Today I'm going to show you a method to use that I consider the first step, and tomorrow I'll describe the more aggressive and effective approach, as well as how to "undo" a driver update if things should go wrong.

The first step is to create a System Restore point, to give yourself a fallback position. I reco doing this whenever you make significant changes to your machine. (To see my series on the System Restore tool, click here.)

Then you need to access your Device Manager tool. There are a couple of ways to do this, but I use Start >right-click My Computer >Properties >Hardware tab >Device Manager. Now you will see a list of the components on your machine, as shown in the example below.
devmgr.jpgSome, in fact most, of these items you do not need to worry about updating. The items that typically will give you the most improvement are: graphics, sound, printer, network (or modem) adapter, and (sometimes) monitor.

Begin by selecting the device you want to update the driver for -- I am going to use for demonstration the sound on a laptop computer -- and 'expand' the hardware list by clicking on the "+" sign next to the proper category, in my example that will be the "Sound, video, and game controllers" category.

Next, double-click on the device name to open its Properties dialogue window. In my case that's "ESS Maestro PCI Audio", and then click on the Drivers tab, which will now open a window that looks like this.
snddrvr.jpg
Now click on the Update driver button, which launches an automated process called the "Hardware Update Wizard". Accept the default radio button setting ("Automatically") and click "next".

Now Windows will go out and "search" for a "better" driver than the current version, and when it finds one, will help you install it via a couple of "Next" clicks. Do this for all the devices (device types) that I listed above.
Unfortunately, the  most common result of the search returns this window.
cannot.jpg
This is because Microsoft has built into the search parameters a complex formula of what constitutes "better". To them, better does not just mean "newer" (ie, a more recent version number), but whether or not the driver has been tested and approved in the Microsoft labs (for a fee), and whether or not the driver's author has shelled out the dough to buy a digital "certificate" (for another fee).
Since this is a simple driver, and not a new miracle accounting program, or other retail piece of code, most authors skip these expensive steps... and so the Update search will disregard these drivers as if they didn't exist. Tomorrows post will deal with this issue.

But doing this process can and does produce results, and it is the method I reco as the first step in a faster/better PC. New drivers are released all the time, so I do this every so often.

To read Part 2, click here.

Today's free link: I have reco'd the popular Mozilla Firefox web browser here before, and I think it's only fair to tell you of another -- Avant uses the IE 7 rendering engine, but advertises itself as the "fastest browser on earth". I like it for its built-in security features, such as tracks erasing, and its rss reader. Take a look at the Avant homepage, and then give it a try.

Copyright 2007-8 © Tech Paul. All rights reserved.jaanix post to jaanix

Wednesday, September 3, 2008

Add Firewire 800 To Your PC-- Fast Video Transfer

Adding new capability to your PC is called "upgrading", and today I am going to tell you how easy it is to upgrade your machine to include Firewire capability.

Firewire "transfer technology" is faster than USB and can be a real benefit to those of you who own digital camcorders, or are thinking of transferring your VHS video tapes onto DVDs, or are otherwise working with digital video.

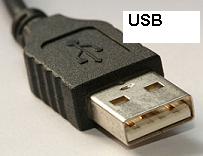
First of all, what is Firewire (aka 1394)? Firewire is, in essence, a wire (cable, actually). It looks and feels and acts very much like your quite familiar USB cabling-- it is so similar looking that they changed the shape of the plug so you can tell them apart. The USB is rectangular, and the Firewire has an angular extension on one end.

The main difference between the two data transfer technologies is speed: the original USB speed is 12 Mbps and the original Firewire is 400 Mbps, the newer "2.0" standards (which you really should have by now) is 480 and 800 million bits per second, respectively. So, if you have large data blocks to transfer -- such as video -- from one device to another, Firewire 800 is the way to go.

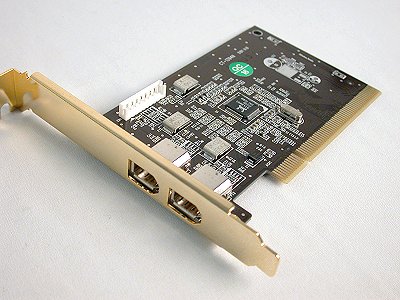
Tip of the day:If your machine did not come with a Firewire port, or if it did but it is the older Firewire 400 type, upgrade your system by adding a PCI expansion card to your PC. The photo above shows a two-port Firewire PCI card. These expansion cards come in a variety of flavors; some offer more ports, or "combo" ports like 2 USB + 2 Firewire. They are very affordable: the simple 2 port shown above can be found for $18.

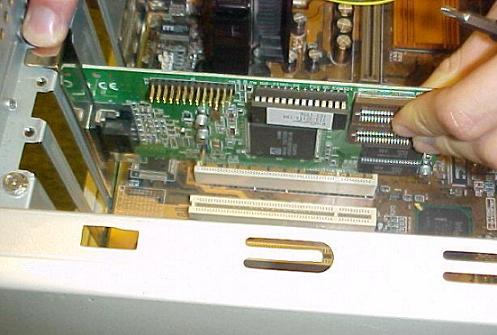
Installing an expansion card is not difficult but if you're not inclined to try it yourself, a Tech Support and/or Repair person (like myself) will not charge you much to put it in for you. It is a simple matter of inserting it into a white slot on the motherboard.
1) Load the device drivers: It may seem counter-intuitive to run the Install CD before the device is actually in the PC, but this is the usual method. Insert the CD that came with your card and follow the wizard. This will install the Plug-and-Play device drivers for your new device.
2) Prepare your PC: The next step is to completely power-down, and unplug your computer from the wall outlet. Now open your computer's case; typically there's two small screws holding your side panel in place. Lay your PC on its side so that the motherboard is down at the bottom, and you can see all the slots and components.
[Attention: Do not reach inside the case unless you are wearing an antistatic wristband, or until you have touched a bare metal section of the case's frame. A very, very small dose of static electricity can ruin electrical components inside a computer.]

Find an open (white) PCI slot, and remove the corresponding metal tab from the back of the case. This will open up an outlet for the faceplate of the expansion card.
3) Install the card: Gently, but firmly, insert the card into the open slot. You want to use enough force to fully "seat" the card into the slot. 4) Validate your install: Plug your PC back into the electrical outlet and power up your machine. Windows will launch, and it will detect your new hardware. A small dialogue window will open down by your clock that tells you that Windows is installing your New Hardware. Unless there is some glitch, you are done. You can start using your new device.
* If Windows does NOT detect the new card, insert the Install CD and go through the wizard again. If this still fails to install your new card, it is likely that the card itself is not fully inserted into the slot -- power-down and really push it in this time. Repeat step 4.
If this fails (and this is unlikely), read my troubleshooting article here.

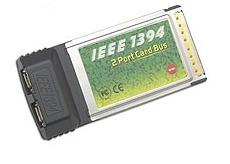
Laptop owners: For those of you who want to add this capability to your notebook PCs, the steps are very similar -- except you won't be using a PCI expansion card. You will want to purchase a Firewire PCMCIA card, such as the one shown here.

Today's free link: Teen Chat Decoder. From site: "This free Teen Chat Acronym Decoder lets you 'Crack The Secret Code' your teen uses online, in Chat Rooms, online chats, Instant Messages, & Text Messages. This is an awesome software for parents because it gives you an inside look into your teenagers online life."

Copyright 2007-8 © Tech Paul. All rights reserved.jaanix post to jaanix

Friday, July 18, 2008

Rejuvenate your PC

When my computer was fresh-out-of-the-box, and all shiny and new, it was speedier than it is now. It had a spring in its step that seems to be lacking now. Can you relate?

There are reasons for this 'slowing down', of course. Some of them are just 'facts', and there's not much we can do about them, and others we can (should) remedy. Today I'll list and review the basic PC steps, which will optimize your computer's performance, and provide you with the links to my more detailed How-To's.

*Your files:
A primary cause for PCs 'slowing down' is simply that there is more stuff (files) on your hard-drive now, and the more you put on there, the more there is for your computer to keep track of (index). You have added applications (programs), Updates, and all your files, and the volume on your hard-drive has grown-- probably quite a bit! [note: to function properly, you should always have at least 10% "free space" on your drive.]

Clean off the junk. As you use your machine, and browse the Internet, you will pick up scraps of files (temps), and you will put things into the Recycle Bin, etc., and I recommend that once a week you use the Disk Cleanup Tool to "take out the trash". My article on this tool is here.

Get organized. As you machine writes data to the hard-drive, which it is doing a lot, it places things in the first available block of space to save time. The first available space is not necessarily the best or most logical place, though, and we need to come along after and put things in better order. The tool for this is a "defragmenter", and it should be run at least once a month. I wrote an article on how to set this tool to run automatically, here.

Make space. You may also want to make more space on your hard-drive, and do some "serious cleaning", by going into the Add/Remove Programs area of your Control Panel and uninstalling any programs you never use anymore.

Get physical. It may seem a bit un-intuitive, but excess heat can cause your PC to run slower, and so I highly recommend a physical cleaning of your machine as well... particularly removing the dust and lint build-ups around your fan vents (depending on your environment, you may want to do this every couple of days). Every so often, open the cover (usually a side panel) and use a can of compressed air to blow out all that dust and dirt and pet hair...

Today's free link: Believe it or not, some people just prefer not to use the tools built into Windows, and insist on using specialized "3rd-party" tools to do the job (imagine that), and a top-rated (free) disk defragmentation tool is the Auslogics Disk Defrag.

Copyright 2007-8 © Tech Paul. All rights reserved.jaanix post to jaanix

Monday, June 9, 2008

System Restore / ID Theft / Startup

"System Restore won't work", "I'm worried about ID Theft, how do I know if an email is legit?", "I can't get this #$*& program out of my Startup folder" -- these are examples of some of the questions I have received since posting my articles on these topics. Today I'm going to review, and provide more solutions and answers.

Tip of the day: Since I'm going to cover the questions above, there is not going to be a single "Tip of the day" today. Instead, there will be "Today's three questions"...
More on System Restore: What to do when System Restore just refuses to work. As I mentioned in my first System Restore post, SR simply is not a failsafe miracle worker. There are troubles that can occur that it simply does not repair -- such as a corrupted SAM database. It is however a good place to start. It does undo a lot of the damage you can accidentally do to your machine. This fact is why you should always make a back up of your system -- either a "disk image" made with a 3rd-party utility like Acronis True Image, or Norton Ghost, and/or Windows Backup Utility (Start >Programs >Accessories >System tools >Backup).
I stated in the prior article, and will repeat here, that you may have to repeat the System Restore process several times before one "snapshot" finally takes. When you use SR, you will see a calendar with available snapshots in bold dates. You should see several. Start with the most recent date and time, and work your way backwards. If you have done this with no luck, you probably have one of those troubles System Restore is not designed for. Either look elsewhere for solutions, or call for some Tech Support (we Tech Support folks need to make a living too, you know).

Legit vs. Phishing: "how do I know if an email is legit?" In my post about the rocket scientist, I discussed phishing and recommended an anti-phishing site toolbar, which combats a form of phishing called "pharming".
I suggest you take no chances with emails. Simply do not click on links in emails. Also, realize that your bank will not send you links. They know about phishing, and they figure you already know their URL (you should have it bookmarked, so use that...or call them directly). Also be aware that just because an email claims to be from a friend or relative, doesn't mean that it is. If you are not expecting an attachment.exe "executable" (application) or "you gotta see this!" .jpg from Uncle Fred, by all means don't open it! Email him and ask him, "did you send me a..?" It is an easy thing for an Evil Doer to spoof a Sender address.
And finally, make sure your antivirus definitions are up to date. If it is not already on by default, open your antivirus' Options and look in "Update Options" for "Download and install new definitions automatically" (or words to that effect) and make sure it's selected. If available, have it set to scan email and email attachments as well. (If it's not, consider switching to the free Avast! or AVG antivirus programs..)

Removing stubborn start up programs: If the methods I described in "My Startup folder is a clown car" proved insufficient for getting rid of a really determined program, there are three more methods you can try. The first is to read my Manage your Startup programs; second is msconfig, and the last is editing the Registry.
If these easy methods in the article didn't do the trick, start by opening the msconfig utility. Click Start >Run and type in "msconfig" (no quotes), and then click on the Startup tab. Here you will see a list of the programs scheduled to start when Windows boots. Uncheck the checkbox next to the program you are having the troubles with. You will need to restart your system for the changes to take effect.

The second method, editing the Registry, is for advanced users who are comfortable treading in such risky waters. Changes made to the Registry are immediate, and there's no "undo" feature. If you feel you are determined to dive in, please create a Restore Point before starting and back up the Registry to a .txt file first. Please read (or re-familiarize yourself with) Microsoft's detailed how-to here. They Key you'll be working with is HKEY_LOCAL_MACHINE\SOFTWARE\Microsoft\CurrentVersion\Run.
But please: this is not for the inexperienced. Do not try this without reading and understanding what editing the Registry is about, and what damage one mistake can do. First use the aforementioned methods and please consider simply using Add/Remove Programs to "retire" the troublesome program altogether...or try a program like StartUp Cop.

Today's free link(s): I am satisfied with this freeware Startup manager: Ashampoo StartUp Tuner 2.

If you have been a victim of a phish, have been clicking unsolicited links willy-nilly, or let a window that magically popped open one day "scan your computer to remove infections".. or just want to know your scores -- get a free credit report , and find out if you're the only "you" accessing your credit.
[Note: I believe it is worth it to have your credit reports monitored.. which is not a free service. For $5/month, I use , which monitors the big three report companies.]

Copyright 2007-8 © Tech Paul. All rights reserved.jaanix post to jaanix

Wednesday, April 30, 2008

Run your defrag tool for a faster machine*

I am continuously surprised at how many PC users have let a year or more pass since their last defrag, or never have defragged at all. "Why is my machine slower than it used to be?" That is a very common question. It is a question with no single, or simple answer. Yet there is a single and simple step you can take which will improve the speed at which your machine reads and writes data, and which, if done regularly, will keep it at near the speed it had when it was new--it's called "defragging" (short for defragmentation). Defragmentation remedies file fragmentation, which occurs, invisibly to you, over the course of time.

Tip of the day: It is commonly suggested that you run a defrag at least once a month. I recommend that you schedule your defrags to run automatically using Windows Scheduled Tasks tool. Set it and forget it, as the old saying goes. Here are the steps to do it:

1) Start>Control Panel, click Performance and Maintenance and then click Scheduled Tasks.
2) Double-click Add Scheduled Task to open the Scheduled Task Wizard, and then click Next.
3) Follow the wizard to set a schedule for when to run the defragmentation program (I recommend running it late at night, as it can take a while to complete), and be sure to supply a password for the account on which you want the task to run, and mark the checkbox "wake the computer to perform this task."
4) Check the box for Open advanced properties for this task when I click Finish. On the Run line, add the drive letter for the drive to be defragged. For example, %SystemRoot%\System32\Defrag.exe c:

(This example is for XP, but you can do it in earlier--all the way back to Win 95--versions as well)

Another thing you can do is get rid of the files on your hard drive that you no longer need: such as emptying your Recycle bin and deleting your temp files (a quick, safe, and simple way is Windows Disk Clean Up tool) and there are some nice applications to automate and/or simplify this for you, such as today's free link. Also, use Add/Remove Programs to remove applications you no longer use. Go to Start>Settings>Control Panel>Add/Remove Programs and wait for the list to "populate". Click on those programs you are certain you have no more use for and click on the Remove button.

Today's free link: CCleaner CCleaner is a freeware system optimization and privacy tool. It removes unused and temporary files from your system - allowing Windows to run faster, more efficiently and giving you more hard disk space.

* Yes folks, I have posted this article before. I remind you that you should run defrag once a month at the minimum.

Copyright 2007-8 © Tech Paul. All rights reserved.

jaanix post to jaanix
Share this post :

Friday, April 11, 2008

Get a boost from your thumb drive

Thumb drives are amazing. They're fast, they're small, they make great keychain fobs, and they're affordable. I have seen 8GB thumb drives for as little as $30, and 16GB's for $50.
That's right-- sixteen billion bytes. (The hard drive on my P-II [still running] is 4.3GB's.)

Yes, thumb drives are all those things, and they're practical too. By purchasing a U3 drive, or downloading the Portable Apps suite, you can easily convert your thumb drive to a "computer on a stick" and run your applications from it (as opposed to the host computer). This can be particularly useful when traveling, as you can carry your bookmarks, contacts, and documents with you.. and you won't leave histories and 'tracks' that someone can read later.

In this article, http://techpaul.wordpress.com/2007/12/12/how-to-install-a-program-on-your-thumb-drive/, I tell you the steps for installing (pretty much) any program onto your thumb drive. By doing so, you can load your favorite, and most useful programs onto your computer-on-a-stick.. allowing you to carry a computer on your keychain (sort of).
I recommend loading a antivirus, and a couple of anti-spyware onto your thumb drives, and -- since thumb drives are small and "losable"-- using encryption to render the drive unreadable without knowing the password.

In another article, http://techpaul.wordpress.com/2007/06/28/put-your-thumb-drive-to-work/, I describe how to make a thumb drive "bootable", and how you can load it up with diagnostic and repair programs; thus turning it into a recovery tool, and portable repair kit-on-a-stick. (This is for the more geek-inclined, but there is some good information there even if you aren't skilled in computer repair.)

But even if you aren't interested in using a "computer on a stick", Vista users can still get some extra mileage out of your drive that you might not be aware of...
Tip of the day: Improve Vista's performance with ReadyBoost. Loyal readers of this series will already know that 1) Vista is a resource hog, and 2) the best way to improve Vista's performance is to give it lots of RAM. Well, the flash memory in your thumb drive may be fast enough for Vista to use as additional RAM (this is determined by the make/model of your thumb drive. Typically, the discount, or generic drives are not fast enough).

When you plug in a thumb drive, a small window opens which provides a list of options of what you want to do with this device-- one of the options is "speed up my system". Select this, and another window opens; click "Use this device". If your thumb drive is capable of ReadyBoost, you'll see a slider which allows you to allocate how much of your drive's room you want to give over to the Vista OS-- accepting the default is fine.
That's it. You're done. Pretty painless way to add RAM, eh? (cheap, too.)

Today's free link: today's free link is a repeat, but it is simply the best way to encrypt your volumes (drives), files and/or folders -- such as your thumb drive. Download the free TrueCrypt, and make sure a lost thumb drive won't be a minor disaster.

Copyright 2007-8 © Tech Paul. All rights reserved.

jaanix post to jaanix
Share this post :